Tuesday 24 June 2008

The Battle Of Mollwitz. 10th April 1741


THE MOLLWITZ CAMPAIGN
Following Frederick’s invasion and occupation of much of Silesia during the winter of 1740 – 41 the Austrian high command charged General Neipperg with its recovery. At the end of March 1741 he led 15,000 Austrian reinforcements into Upper Silesia. The Prussians were still dispersed in winter quarters and this move caught them by surprise.

Neipperg advanced slowly through the mountain snow and did not reach Nysa until 5 April. His force, now numbering 19,000, was enthusiastically welcomed by the citizenry who proclaimed the Austrians as liberators. Both troops and commander were supremely confident of victory, (Austrian hussars had taken to bleating “bah, bah” at the Prussians they encountered), so instead of taking time to rest, the force advanced to the town of Mollwitz where they found the protestant population far less helpful and welcoming.


Meanwhile the Prussians had not remained inactive. Frederick had ordered any troops blocking the advance of the Austrians not to risk an engagement. Instead they were to fall back whilst the two main bodies of Prussian troops under the command of himself and Schwerin found time to concentrate. When on 10 April this united force of 21,600 marched unexpectedly from the south of Mollwitz, thus placing itself between the Austrians and their Moravian base, it was the Austrians who were surprised.

Any advantage the Prussians had achieved was now lost as they took an absurdly long time to carefully, and as it happened imprecisely, to deploy. This gave the Austrians time to hurriedly form an infantry line under the cover of a cavalry screen.

The first of many battles between the forces of Maria Theresa and Frederick was about to begin…………


SET UP AND RULES
This scenario was written specifically for use with Piquet (as are most of my scenarios). Coverting it for other rule sets will be fairly easy providing that special rules for "Frederick leaves the field" and "Occupying Mollwitz" can be devised.

INITIAL DISPOSITIONS AND SCALES
The deployment map shows the battle as set up for my own 25mm figures on a 10’ x 6’ table where a typical 4 stand 16 man infantry unit has a frontage of 16cm.

Each unit represents approximately 2 cavalry regiments or 4 infantry battalions. Consequently the troop ratios are slightly out, especially with regards to the cavalry formations of either side (See Deployment Map Key for actual composition).

Romer’s cavalry has been deployed in the position it took after being bombarded by Prussian artillery and just prior to its first attack. This is key to game balance. Romer’s
rear line cavalry are in column of route.


NOTES ON TERRAIN
The snowfields (readers will notice that snow in my world is green) of Mollwitz are flat. The streams are bounded by boggy ground but I have assumed this would have been frozen solid and, consequently, easy to traverse.

DEPLOYMENT MAP

MAP KEY AND ORBATS (One for the Austrians, One for the Prussians).


SEQUENCE DECKS
Sequence decks are as per the standard Piquet Cartouche supplement except that the Prussians side has a Charismatic Leader card added. (See below).


FREDERICK LEAVES THE FIELD.
Following Romer’s successful attack Frederick was advised to leave the field lest he be captured. He did so, on a horse later called “The Mollwitz Grey”. To simulate this when the Charismatic Leader card is turned the Prussian player must roll a d12 Vs his total number of destroyed or routed units and leaders. If the check is failed Frederick leaves the field. If he leaves the field or is killed 2 dress the lines cards must be added to the Prussian deck and 5 morale chips are lost. The 2nd in command is Schwerin who must supersede command in the usual way.


OCCUPYING MOLLWITZ
Although the Austrian commanders are confident, their infantry is not. If, at any time, they choose to occupy the buildings of Mollwitz, the army will deem the move to be a retreat in the face of the enemy and their morale might be shattered. If Austrian infantry occupy Mollwitz before the Prussians roll D6 and D8: The result is the number of morale chips lost by the Austrians.

VICTORY CONDITIONS
This is a very hard battle for the Austrians to win especially as their infantry is so poor (they were described as raw recruits and militia). To win the Austrians, must stay on the field for 7 turns (until nightfall), voluntary withdrawal off table is not allowed, and they must inflict at least 66% as many casualties, in units destroyed and routed, as they suffer. Anything less is a Prussian victory.


FIGURES AND OTHER BITS
All figures are Front Rank or Wargames Foundry. All were Painted in enamels by Olicana Painting Services (that would be me). Terrain tiles by TSS. Trees and walls mainly by Last Valley. Streams scratch made from the perspex sides of an old shower unit. Roads scratch made from fibre glas sheet, polyfiller and scatter. Building scratch made from card and polyfiller.

Sunday 22 June 2008

The Crusades - my latest project.


About 18 months ago I finally decided to put off starting a Napoleonic collection for a couple of years. This was mainly down to my last project, the Great Italian Wars, which put me off the idea of painting complex uniforms for pleasure, for a while. I think it was the Landsknechts – or was it the Gendarmes?

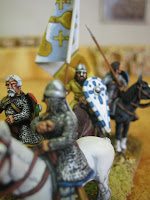
Thus I started collecting figures for the First Crusade and early Kingdom of Jerusalem period. All that mail and little equipment – lovely! My Franks are now well on the way to completion, so I thought I would keep you apprised of the current state of progress.


The Franks
The total collection, that is to say figures ‘in the cupboard’, I may need a few more knights, comprises:

Knights: 2 units. Each 18 figures based on 4 60mm wide 90mm deep stands. (Painted and based)
Hospitallar: 1 half unit. 9 figures based on 2 60mm wide 90mm deep stands.
Turcopoles: 2 units. Each 12 figures based on 4 60mm wide 90mm deep stands. (Painted and based)
Heavy infantry: 5 units. Each 30 figures based on 4 60mm wide 60mm deep stands. Three units have integral crossbows, 2 units have integral simple bows. (Painted and based)
Sailors: 1 unit. 20 figures based on 4 60mm wide 60mm deep stands. (Painted and based)
Pilgrims: 4 units. Each 20 figures based on 4 60mm wide 60mm deep stands.
Command stands: 4. Each 3 – 5 figures based on a 40mm wide 90mm deep stand. (3 painted and based)


FIGURES: All the figures are Perry Miniatures 28mm. All figures painted with enamels, mainly humbrols.

BASES: Bases are 4mm thick ply. Basic scatter is a 50/50 mix of fine child’s sandpit sand and pet shop ground oyster shell grit. Small rocks are cat litter, large rocks are cork. This has been stained with diluted acrylic ink then dry brushed with enamels. Grass scatter is Woodland Scenic stuff, mainly coarse turfs.

The Knights


The Infantry


The Turcopoles


I am now having a break from the Christians and ploughing through a large pile of Saracen cavalry. When the finished product is as numerous as the Franks, I’ll put up some photos and army composition etc.

Gross Jagersdorf report


The element of surprise did not last long for Lehwaldt. Before his main attacks had a chance to press home the Russians had managed to form a good front line of defense and their reserves were pouring through the woods to support it. (The first three turns ended in early identical initiative rolls and the Prussians only turned one Brilliant Leader card.) The battle broke down into three distinct actions. The first opened on the Prussian right.


HOLSTEIN’S ATTACK
Holstein, vastly outnumbered by the enemy, attacked with reckless abandon. Throwing all caution to the wind his cavalry charged into the Russians. This tactic although suicidal, ultimately served its purpose; it tied down the Russians on that side of the stream for the duration of the battle. The action played out as follows. The first charge of the Prussians was held by the regular Russian cavalry and whilst this melee continued the Cossacks swarmed onto the flank and rear of the engaged Prussians. The first to break were the Prussian hussars, fleeing with Cossacks in pursuit. The Prussian dragoons were also surrounded, but after a very gallant defense they too routed and were cut down to a man. The Russians, feeling all threat removed, began to reorganize before heading back to the main fight developing on the other side of the stream. Indeed the Russian hussars did so. However, the fight was not over. The Prussian hussars rallied and turned on their pursuers, routing them in turn. The bulk of Siblisky’s command was pinned in position again. Towards the end of the battle Holstein’s hussars were finally surrounded and destroyed, but they had served their purpose.


GOLTZ’S ATTACK
Meantime, Goltz and Lupukhin were now engaged in a fierce slogging match. With Fermor’s reserves marching in column through the woods in support Goltz’s position was becoming tenuous. Goltz ordered one of his infantry units into the woods to break up Fermor’s troops before they could shake out into line. This attack was devastating – all but the grenadiers of Fermor’s infantry were broken beyond recall. Now Lupukhin’s position was looking in immenent danger of collapse, but staying power of Russian infantry should never be under estimated. Fermor’s grenadiers formed line and counter attacked in support of Lupukin’s infantry, which also pressed forward, with determination.


SCHORLEMER’S AND DOHNA’S ATTACK
On the Prussian left Schorlemer had been happy to hang back and hold Browne in his position until Dohna’s infantry came up. This gave Browne time to occupy the woods to the left of his artillery with his grenadiers. Dohna’s attack hit at exactly this spot. The grenadiers were sent running and Dohna, now flanking Browne’s line began to advance. But Schorlemer was late to support. Before his cavalry engaged echeloned back to the left, the Russian artillery had destroyed Dohna’s grenadiers and Browne had managed to refuse his exposed flank with cuirassier, and hussars, originally deployed across the stream on the Russian left were arriving in support.


GOLTZ’S ATTACK COLLAPSES AND THE PRUSSIANS WITHDRAW
Goltz’s attack was beginning to crumble under the weight of Russian musketry. His troops were exhausted. Any momentum in the attack had been lost. Russian troops, still fresh, were arriving in numbers. Goltz’s faltering attack now crumbled and his infantry, helping their wounded as best they could, began to retreat. Seeing the battle could not be won, Lehwaldt ordered a general retreat. The battle was over.

CONCLUSION
The battle ended rather historically. The Prussians withdrew and the Russians were unable to pursue. Lehwaldt, with his audacious attack, had succeeded in knocking Apraksin off balance and was duly declared the ‘strategic’ winner.

Thanks to Mark Dudley who lent me his Prussian Red Hussars.

Wednesday 11 June 2008

Gross Jagersdorf 1757


BACKGROUND

Following Frederick’s victory at Prague the Russians, though not entirely ready for war, were forced to come to the aid of their Austrian allies. At the end of May 1757 the Russian army, of 75,000 men under Stepan Fedorovich Apraksin, began its long march westwards in several columns towards its strategic objective, the reduction of East Prussia. The Russian army, suffering terrible confusion and disorder, found the march arduous; it lost 11,000 men before it even reached the border.

East Prussia, held by a Prussian force of only 32,000 men and militia under the command Field-Marshal Hans von Lehwaldt, was an obvious target for the Russians. It was isolated by the ‘Polish corridor’ from the rest of Prussia, and far removed from Frederick’s chief areas of operations further south. It was also a well organised and prosperous province: It was an ideal jumping off point for future operations further to the west. Like a peach at the end of a low trailing branch, it was ripe for plucking.

The Russian army, now 55, 000 men strong, concentrated at Kovno. From here it proceeded northwards in a single thrust against the provincial capital KÅ‘nigsburg. On 29th of August, the army, tired out and suffering from a lack of supply, and following disagreement among its officers as to what to do next, marched back to its previous night’s camp just south of the Pregel to rest. At four in the morning the army rose once more and began its march around the east flank of the Norkitten woods. As was usual the army was in disarray and its order of march would take some time to organise and sort itself out.

Such was the Russian position when Lehwaldt’s army of just 24,700 men appeared on the scene. Well fed, rested, drilled and exercised, this army, half the strength of the enemy, launched itself against its enemy in a disciplined all out attack in true Frederickian style.


SCENARIO NOTES

This action has been scaled down to approximately half size.

Gross Jagersdorf is a difficult battle to stage accurately unless you have a L shaped table or fight the battle as two actions. I do not have access to the former, or wish to do the latter. Fortunately, because of the rules I use, Piquet, and the presence of the stream, I can squash the action into the space available by declaring the stream a type IV obstacle. Type IV terrain requires a Move in Difficult Terrain card and successful tests to cross. This splits the action into two distinct areas.

Outnumbered two to one, the Prussians have little chance of victory, and consequently Gross Jagersdorf can lack something as a game. But again, because of the rule mechanics, the game can be artificially balanced. Firstly, Apraksin should be classed as abysmal and have two Command Indecision cards added to his deck, this simulates the confusion of the army as a whole. Secondly, although Lehwaldt cannot justifiably be classed as above average, the fact that he has the element of surprise can be modelled by adding three Brilliant Leader cards to the Prussian deck. At the end of each turn one Brilliant Leader card should be removed – as the element of surprise is lost.

Considering the imbalance of the game, the Prussians win the game if they can destroy or rout more units than they similarly lose, regardless of possession of the field. Doing this will, as happened historically, deflect Apraksin from his strategic goal.

INITIAL DEPLOYMENTS


MAP KEY

RUSSIAN

Sibilsky:
1,4,5 Line infantry
2 Horse Grenadiers
3 Cuirassier
6,8,9 Cossacks
7 Hussars

Lopukhin:
1,2,3,4,5 Line Infantry
6 Grenadiers

Fermor:
1,2 Artillery
3 Grenadiers
4,5 Line Infantry

Browne:
1 Cossacks
2 Cuirassier
3 Artillery
4,5 Line Infantry
6 Grenadiers


PRUSSIAN

Holstein:
1 Dragoons
2 Hussars

Schorlemer:
1 Hussars
2,3 Dragoons

Goltz:
1 Grenadiers
2 Artillery
3,4,5 Line Infantry

Dohna:
1 Grenadiers
2,3 Line infantry