Thursday 27 December 2012

Porcinorci - battle report, part 1

On the French right the battle opened with both sides pushing forward mixed light cavalry 
The Imperials came off the better, but the skirmishing is far from over.
The cavalry were followed into battle by the infantry. The Swiss, both pike squares up, are seen here advancing into a hail of deadly arquebus fire from a Spanish colonela - they rolled an 11 Vs a 1, taking out 3 unit integrity at a stroke.
On the Imperial left the Landsknecht and Spanish foot, supported by Genitors, go in hard against the French infantry.
 A fire fight is developing, but the Gascon crossbow is no match for the massed troops of the Empire.
 In the centre, the French Gendarmerie advances into the teeth of the oncoming Spanish.
 This contest might well decide the day. Gendarmes, supported by artillery, taking on pike square.
It will be interesting to see how the rules work with this.


We only played a single turn of the battle last Wednesday night so there is plenty left in it. It will resume next Wednesday.

I have also been doing lots of work on the rules. In a couple of weeks I should have a play test version ready for those who want to check them out.

Friday 14 December 2012

The Battle of Porcinorci - the set up

I have set up this fictional Italian Wars battle to test some rules in 'open field' situations. Consequently, the terrain has been set up to aesthetically form an amphitheatre in which the main action will take place.

The battle features armies with an identical (unless my mathematics are wrong) unit integrity point total. I have not tried to balance quality, but I don't think that the sides are too far off par. It will be interesting to see how the rules are working: there is nothing like a reasonably large battle on open ground to do that. Here are a few shots of the set up.

Spanish (left) and French (right) showing, in the foreground, the open flank beyond the ridge.
Spanish right: Light and heavy cavalry supported by two colonelas. 
Spanish centre and left: Artillery, two colonelas, two 72 figure Landsknecht pike squares, plus a light sprinkling of cavalry.
French right and centre: French infantry (Gascons and Picard pikemen) and Gendarmes d'Ordnance supported by artillery.
French left: Swiss infantry (two blocks of 54 pikemen) supported by mixed light horse.
Colonela and light cavalry.
Massed pike.
Swiss pike units 'coming up'.
Gendarmes.
Gascons and Picard pike.


Peter and I will fight this battle out next week.

Thursday 13 December 2012

Cerignola - One last time

Last night I christened the upgraded war game table with another refight of Cerignola. The deployment featured the alternate (and not very historical) set up of having the French artillery present; plus a few other minor balancing changes.

Probably the biggest change occurred off table, so to speak. I have been working on the rules and I have classified the troop types differently. The Spanish infantry were downgraded to 'C Class' (D8 CC, D6 DD) with arquebus specialist status. This massively changed how the battle was fought - there were no grizzled Spanish veterans here! The Swiss were 'A Class' (D12 CC, D8 DD) with stubborn status. The reversion to rather old school classifications (A - E) has proved to be a very useful and flexible tool for this period.
The other alteration is to bite the bullet and do away with, light through heavy, artillery classification. After much reading, I have decided that the weight of artillery is of little matter in a field battle situation. Artillery in the early 16th century was so inaccurate, and so slow firing, and the quality of powder and projectile construction was so varied, that the size of a cannon ball would make little difference (except when fired at castle walls and the like). This flies in the face of most wargames rules, but just because cannon size features in most renaissance rule sets doesn't mean it is based in fact - personally, I now rather think it is based in 'wargames tradition'. Crew quality, and the quality of the cannon's construction, was probably far more important at this date so it is probably better to adjust fire dice by crew classification - usually D class (D6, D6), C class (D8, D6) for the good stuff (French?), with specialist shooter status for the very best.

So what happened? Well. here is a short report.

 The French launched the Swiss at the defences
 Routing a Spanish colunela.
As the melee continued between the Swiss and German pike, the French launched their Gendarmes into the fray.
On the other side of the field French pike were halted at the ditch and subjected to volley after volley of deadly arquebus and cannon fire.
The fight became general along the entire front of the defences.
Following an explosion (Stratagem) in the lines, the french gain an advantage and cross the earthwork.
Fabricio is killed. The Landsknechts, after a fight that lasted most of the battle, finally give way.
The Spanish position is outflanked.
The French have won!!!!

Peter has won; again; bastard. I tried three bloody times to win this battle using the French, and he does it first time!


Next week we will fight an open field battle. It will be fictional, but might involve the same armies.

Chow.

Tuesday 4 December 2012

Out of chaos......

I have not posted or played much lately. My mother died at the end of October, and family business, and family generally, have been my main priority.

My house has also been in absolute chaos for over two months. Builders have been knocking down big supporting walls for a new kitchen diner. But, out of that chaos came two big  kitchen base units (one was a cupboard and one held up the old kitchen sink) to add an extension to my wargames table.


This has , for a short time, created more chaos in the hallowed halls of my games room. It's amazing how much junk you can store in a secret passage!


This shot shows the new kitchen units added to the two banks of existing units that hold up my table (and the 'secret passage' between). With the top off, it clearly shows how my table is constructed.
This shot shows one of the unit banks, and the drop leaf extension which has been moved to one side, out of the way. The fact they don't match makes little difference to me as I rarely see more than the top.


This shot shows the new section of 18mm table-top being screwed into place. This section measures 6' x 4' feet. It makes the table a rigid 12' x 6'. This is the same size as the table was before with the drop leaf and a 'floating extension' piece.
This shot shows the drop leaf section 2'8" x 6' in place. It is connected to the main table with a battened 6' long brass piano hinge. The leaf has been strengthened and made rigid with 2 x 1 inch batons, glued and screwed to the under side, along the three outer sides.
The 2" x 1" batons also form the top anchor point for the legs. These legs are 2" x 2" in section. They are held in place by a long bolt, 50mm washers and a wing nut that pass through leg and baton.

Additional strength is provided to each leg by two long metal braces (pinched from an old wall paper pasting table) at 90 degrees to each other. These are simply secured in holes in the leg and batons.
This drop leaf creates a table 14' 8" x 6'. The gap at the end is not that great, but it is passable. It will only be used for very big games, or games involving a 'long flank' for off table march ons.
This shot shows the drop leaf down, and the long hinge. It also shows the chaos retreating.
Another shot of the drop leaf in its 'redundant' position, this time from the side. Drop leaf extensions are usually worth having because, when not in use, they take up so little space. You can see why it is 2' 8" long - the table height is 2' 9"!   The legs, bolts, braces, etc. are tucked away just under, and behind, the drop leaf.

Thursday 8 November 2012

Cerignola Battle Report

Having shaken itself out into two supporting lines the French gendarmerie charge the defences....
....before being forced back in disorder.
The Swiss and French infantry charge whilst d'Alegre's command tries to outflank the Spanish position. 
D'Ars, leading a desperate charge in person, falls at the ditch. A classic case of having your D'Ars kicked.
Nemours rides into the fray to restore order.
Heavy fighting on the French left is going their way - French gendarmes being gallantly, and effectively, supported by Gascon missilery.
At the entrenchment the fighting is at it's height. The French are making some progress, but they are taking heavy casualties.

Here, Spanish cavalry countercharge gendarmes in support of a hard pressed colunela.
The French are spent, and start to withdraw.
Only on the left are the French now threatening to take the entrechment....
 .....but the right wing collapses and the battle is effectively at an end.


This Battle was much more closely fought than last time. If the Spanish had not had a string of high dice rolls at the critical moment it might have been very much closer. The French will always be hard pressed to win this battle (which is just as well) but, with luck on their side, it might be possible. The French player (that would be me) also made a big mistake early on: I spent far too many morale points keeping d'Ars' cavalry fully intact, when partially might well have been enough. Also, just as a footnote, not one Stratagem was successfully played.

Sunday 4 November 2012

Cerignola 28th April 1503

Historical Background


This battle took place during the war for Naples, between France and Spain, early in the Great Italian Wars.

Following their defeat at Barletta in July 1502 it was the French, under the Duke of Nemours, who took the offensive in the following spring. His intention was to use the usual combination of gendarmerie and Swiss pikes to run down the Spanish in one determined rush – it was a tactic that the French had achieved much with.

The Spanish commander was Gonzalo de Cordoba, victor of Barletta. He was well informed of enemy movements, and marched his army 16 miles inland from Barletta to await the approach of the French who were coming up quickly. He stopped his army, in the early afternoon, at the foot of vine covered slope beneath the small town of Cerignola.


In the short time available before the arrival of the French Gonzalo set his troops to widen and deepen a small stream at the foot of the slope and use the spoil to build an earthwork. The earthwork was strengthened with vines and stakes grubbed up from the vineyards above.


Gonsalvo placed the 2500 Landsknechts, which had been sent by Emperor Maximilian, in the centre of his line. These had been recently placed under the command of Fabricio Zamudio, an experienced Basque leader.

Gonsalvo placed his Spanish infantry to either side of them.
These fell under the command of two brothers: Diego and Pizarro Paredes.


These infantry had recently been organised into new formations, with a permanent command structure. This pattern would become standard future armies. He organised them into Colunelas: from which we get the word Colonel. Spanish colunelas were composed of arquebus, pike, and sword and bucklermen, in a ratio of roughly 2:2:1.

These were supported by knots of heavily armoured knights and other men-at-arms.
 
He set his small train of artillery (13 light guns under Pedro Navarro) at the top of the slope and sent out his Genitors (light cavalry) to worry and delay the Duke of Nemours.


Late in the afternoon, Nemours arrived before Cerignola. He had not reconnoitered the Spanish position because of the interference of the Spanish light horsemen. He was completely unaware of the presence of the earthwork before him. It was late in the day. The French held a very quarrelsome council of war. Nemours favored deferring the action until the next day in order to rest his tired soldiers before the fight. Many of the French captains, led by Yves d’Algre, urged an immediate attack.

The Battle of Cerignola would be unlike the Battle of Ravenna nine years later: where French artillery, facing a similar deployment, decided the day.

Before his artillery had come up into position,  Louis d'Armagnac, Duke of Nemours, gave in to his junior officers and ordered his army to deploy echeloned from right to left, for an immediate attack.


On the refused left, he placed four hundred knights and the bulk of his light cavalry. This, the rearward, fell under the command of Yves d'Alegre. 

To the right of his echeloned line he placed the bulk of his 2000 heavy cavalry and some stradiots. This, the vanguard, fell under the command of Louis d'Ars.


In the centre Nemours deployed his mainward. This was made up of 3500 Swiss and a similar number of Gascon and other infantry. They fell under the command of Tambien Chandieu.


Late in the day, 28th April 1503, as the shadows lengthened, everything was set for one of the most tactically important battles in history. It would demonstrate the power of firearms and the vital importance, being 'the great leveller', they would play in future wars.


Deployment Map
Spanish Order of Battle

Commander-in-Chief: Gonzalo de Cordoba (D12)
Army Die: D10
Morale chips: 32
Characterisation cards: Stratagem 1 (see below) / Like Hail (Missilery Up1)

Spanish Left:
Gonzalo de Cordoba (D12)*
1 unit of 8 Genitors (CD 10 / DD 8 / Skirmish)

Spanish Left Centre:
Diego de Paredes (D10)
2 units each of 36 Spanish infantry in colunela (CD 10 / DD 8 / Brittle melee)

Spanish Left Centre:
Gonzalo de Cordoba (D12)
1 unit of 8 Spanish Knights (CD 10 / DD 8)

Artillery Left Centre:
Pedro Navarro (D10)
2 units each of 1 light gun and crew. (CD 6 / DD 6 / Brittle)

Spanish Centre:
Fabricio Zamudio (D12)
1 unit of 54 Landsknecht pike (CD 10 / DD 8)

Spanish Right Centre:
Pizarro de Paredes (D10)
2 units each of 36 Spanish infantry in colunela (CD 10 / DD 8 / Brittle melee)
1 unit of 8 Italian Condottiere men- at-arms (CD 10 / DD 6)

Spanish Right:
Gonzalo de Cordoba (D12)*
1 unit of 8 Genitors (CD 10 / DD 8 / Skirmish)
1 unit of 8 Italian mounted crossbow (CD8 / DD 6 / Skirmish)

*No command figure present. Gonzalo de Cordoba commanding by default.

Special rules and notes:

The Spanish player’s mission is to hold the earthwork against French attack until darkness falls, and the French are forced to withdraw. Darkness will fall after the completion of two full turns. Turns ending on an equally rolled initiative are ignored regardless of the number of cards turned.

The Stratagem 1 sequence card allows Gonsalvo de Cordoba to move, and if within command distance, rally 2UI and the vexation of an infantry unit that has suffered due to the explosion of munitions at the entrenchments. The Spanish player does so with the words "Courage, don't you see the first victory beacon is lit?"

French Order of Battle

Commander-in-Chief: Louis d’Armegnac, Duke of Nemours (D10)
Army Die: D10
Morale chips: 36
Characterisation cards: Stratagem 1 (see below) / Stratagem 2 (see below) / Momentum March (Infantry add 1 move)

French left (Rear):
Yves d'Algres (D10)
1 unit of 8 French Gendarmes (CD 10 / DD 8 / Elite)
2 unit each of French mounted crossbow (CD 8 / DD 6 / Skirmish)

French Centre (Main):
También Chandieu (D10)
1 unit of 108 Swiss pike (CD 10 / DD 8 / Elite)
4 units each of 12 Gascon crossbow (CD 8 / DD6 / Skirmish / Brittle)
1 unit of 54 French pike (CD 8 / DD 6 / Brittle)

French Right (Van):
Louis d'Ars (D10)
4 units each of 8 French Gendarmes (CD 10 / DD 8 / Elite)
1 unit of 8 Stradiots (CD 10 / DD 6 / Skirmish).

French Off-Table:
Louis d’Armegnac, Duke of Nemours (D10)*
3 units each of 1 medium gun and crew (CD 8 / DD 6 / Brittle)

*No command figure present. Duke of Nemours commanding by default.

Special rules & notes
To make this scenario work, the French must be forced to attack in a determined manner. To ensure this, the French player's victory conditions are brutal. The French player must have destroyed or routed at least three defending infantry units, or have thrown every enemy infantry away from the entrenchments after the completion of two game turns. Turns ending on an equally rolled initiative are ignored regardless of the number of cards turned.

The Stratagem 1 sequence card will cause a single enemy infantry unit manning the entrenchments, and in contact with a French unit, to become vexed and lose 2UI. This represents the explosion of munitions at the earthwork during the melee.

The Stratagem 2 sequence card indicates the arrival of French artillery into the field (historically it never arrived and was captured on the road after the battle). For the artillery to arrive the French player must make a successful check using Army Die Vs Army Die. The artillery must deploy together; it must not be deployed within 12” of an enemy unit; it must be deployed within 18” of the French baseline.

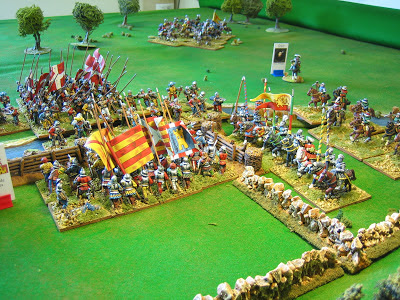
Below, for those who are just here for the porn, are three more shots of the set up.