Tuesday 30 October 2012

Drepana at Fiasco 2012 report.

 The Roman fleet, in some disorder, is rowing for Drepana.

The Carthaginian fleet is almost completely out of the harbour and deployed, menacingly, facing the Romans.

Carthaginians, on your marks, get set....... 
"I can see the Carthaginians from 'ere!" 
Rolling 'evens' on cruise cards the Romans manage to face the Carthaginians before impact, but their line is disjointed and confused.

The special scenario rule element of the scenario worked very well indeed. The Special 1 card was the last Roman card turned on turn 1.

Mixing the squadrons also proved to be a nice tool.
From the Carthaginian left, the clash in the centre. Carthage is winning. Pulcher's ship is already a casualty.
Rome claws its way back into the fight. Honours are about even. Both sides are close to achieving the relevant casualties for victory - though the Romans will still need to escape with five ships.

This was the window of opportunity for the Romans.


Disaster for the Romans. Their vessels are holed and sinking or, even worse, holed and on fire! Carthage cannot fail to win. 
And the situation is the same across the battle area.

End game. Carthage is the Victor.

Peter has won two battles in a row now. He must be stopped! 


As for the show, it was not a bad one. It was busy-ish in the morning but died after lunch. I'm not a fan of this venue, and I'm not sure I'll do another game there with shiny sea: the lighting reflected from the table enough to give you snow blindness. I apologise for the reflections in the photos; it was all I could do to not have vessels disappear into 'hot spots'.

Thursday 25 October 2012

2nd Hispilis and the end of the 2nd Punic War

The Roman onslaught in full swing..... 
...and isolated Punic units become surrounded....
....and then calamity strikes Hasdrubals ranks. An outflanked elephants rout through three units of Spanish infantry - they cause untold chaos and casualties....... 
....The Romans quickly exploit the situation.....  
....the Carthaginian centre crumbles under the constant pressure despite some gallant resistance..... 
The Carthaginian centre is almost destroyed..... 
....and their right is looking flakey and vulnerable to combined infantry and cavalry charges......


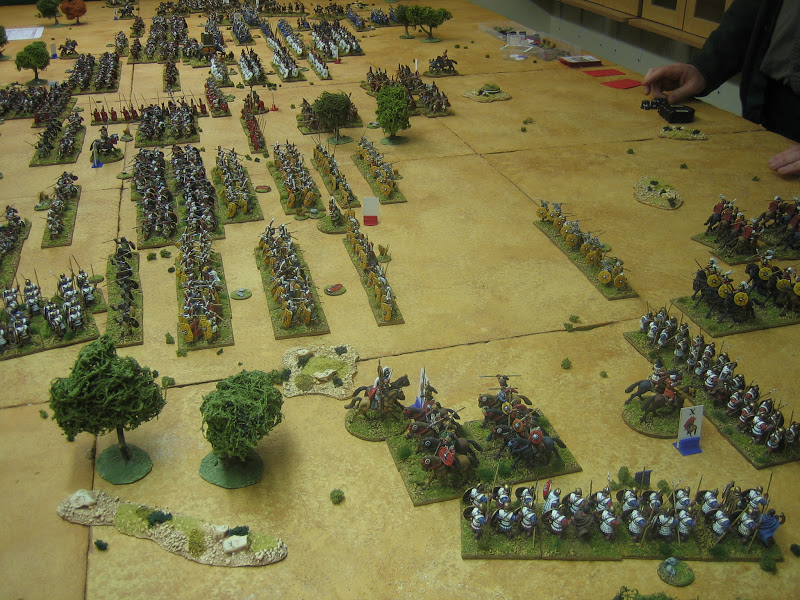
The following shots show the position of the remaining Carthaginian units at the end of turn two. Hasdrubal has run out of morale chips and is handing them, hand over fist, to Scipio.


Hasdrubal is beaten. The game is ended and Hasdrubal accepts a defeat by 'double envelopment'. The battle, in 'battle time' had lasted less than two hours. Consequently, battle casualties were remarkably light. But woe worth the day, Hasdrubal's force of 13 CUs was totally destroyed in the following retreat. Carthaginian resistance in Spain is all but ended at a single stroke.

The Last two campaign cards are immediately played to take political control. Hannibal is especially sneaky, and manages to take control of another province in Italy with political guile!
At the end of the campaign turn this is the situation.

Carthage controls much of Italy and Sicily but is about to lose control of all Spain - she simply does not have an army to prevent its fall without evacuating from Italy. Neither Rome or Carthage has the will to pursue the war and deputations are dispatched to seek an honourable peace.

The following photo shows the peace agreement. Scipio evacuates Spain in return for Hannibal evacuating from Italy. Sicily is ceded by Rome. In return, Campania (Capua and Neopolis) are to be excluded from any alliance with Carthage - they must go it alone and Rome will surely take its revenge upon them! Carthage gives up its right to expand into Massilia. Carthage gains the Balearic Islands. The biggest sticking point in negotiations was the fate of Corsica Sardinia; possession being nine tenths of the law, Rome kept her mid Mediterranean islands.

The Second Punic War is over, but..............

Wednesday 24 October 2012

The Ilkley Lads' Fiasco 2012 Game

As per the last couple of convention games I have done, I will not be running off hard copy handouts for Fiasco 2012. The following is a copy of the at table 'game information sheets' for attendees to read if they are interested enough. I believe this is a far more useful, satisfying way of imparting game information - single sheet handouts do not have the capacity to carry the relevant information. Small slips with this web address will be available at table-side.

The Sicily map, which I have edited in MSpaint, is from the Wikimedia Commons site.

Drepana 249 BC

Background

The Battle of Drepana was a naval battle fought between Rome and Carthage during the First Punic War. This war was largely fought for the domination of Sicily and the arterial Mediterranean trade routes that it controlled. By 250 BC Rome had confined the Carthaginians to the western tip of the island.
In 250BC the victory at Panormus, where the bulk of the Carthaginian land forces on Sicily were destroyed, encouraged Rome to besiege the last major Carthaginian stronghold of Lilybaeum.

Rome’s fleet was to blockade Lilybaeum and prevent reinforcement and supply by sea whilst land forces invested the town. However, despite the increasing level of Roman naval acumen they were still no match for the Carthaginians on the sea. This was proved time and time again by the Carthaginian navy operating out of Drepana which, in broad daylight, managed not only to resupply Lilybaeum, but deliver 10,000 reinforcements and evacuate the besieged army’s cavalry horses as well. For the Roman’s this was nothing short of a humiliation. Something had to be done.


Publius Claudius Pulcher, one of the consuls for 249 BC, decided to mount a surprise attack on the Carthaginian naval base at Drepana. If successful, the loss of the Carthaginian fleet would put additional pressure on Rome’s prime target. Claudius made all the right preparations for the battle. He reinforced his rowers (many of whom had died in the siege lines) with fresh ones from Italy; he manned his ships with most experienced and willing marines the army could offer; he put to sea at night to avoid being spotted.

From the moment the fleet put to sea things started to go wrong. The fleet, of around 120 ships, hugged the coastline, but in the darkness the ships lost contact with each other and their line astern formation became jumbled and confused. When daylight came, even Claudius’ flagship found itself out of position at the very rear of straggling line. As the disorganised Roman fleet approached the element of surprise was lost when it was spotted by shore patrols some way down the coast. Adherbal, the Punic admiral, at once manned his ships, bolstered by large numbers of mercenary volunteers acting as marines, and set sail out of the wide mouthed harbour just before the Romans arrived.

When the first Roman ships entered the harbour mouth the last of the Punic ships were already out to sea, rounding two small islands opposite the harbour mouth, and sailing parallel to the coast, but further out to sea than the Roman fleet. Claudius tried to bring some kind of order to his fleet by signalling his ships to concentrate and form a line of battle. This entailed those ships entering the harbour to turn around, a process that caused even more chaos. Before Claudius could restore any order whatsoever, Adherbal was already forming his 130 ships into a formidable battle line in preparation for an attack.

Wargaming the Battle

The deployment map shows the Roman fleet in three scattered squadrons of five heavy quinqueremes each (A – C). Claudius’ flagship (X) is towards the rear of the Roman line astern. There are 16 ships in total. It is doubtful that the Romans were still using the corvus at this time but a lack of evidence does not prove absence.
Adherbal (X) commands four squadrons (G - J) of four heavy quinqueremes each. There are 17 ships in total.

Rules
This battle is being fought using Fleet of Battle rules published in Wargames Illustrated (# 278) December 2010. The scenario requires two special scenario rules, otherwise the rules will be played as standard:

1) Each fleet only has one flagship for all three squadrons. This has been done to emphasise the relative position and effect of the opposing admirals, and because of the relatively small fleet size.
2) The Roman player may not use Turn cards to turn ships that are not in the Entrance to Drepana Harbour square, until the Special 1 card has been played.

Fleet scale is one ship model represents approximately 7.5 ships
Rome
Trained Fleet Command: D10
Trained Fleet Deck: Replace 2 Lull Cards with 1 Squadron Action, 1 Tactical Advantage.

Squadron Quality 
Command: Poor D8
Ramming and Raking: Trained
Boarding: Seasoned
Seamanship: Trained

Carthage
Trained Fleet Command: D10
Trained Fleet Deck: Replace 3 Lull Cards with 2 Squadron Action, 1 Tactical Advantage.

Squadron G & I Quality
Command: G & I Seasoned D12, H & J Trained D10.
Ramming and Raking: Veteran
Boarding: Seasoned
Seamanship: Seasoned


Victory Conditions
To win, if the Roman ships are not equipped with corvus they must sink or capture 5 or more enemy ships and escape with 5 ships. If equipped with corvus they must sink or capture 7 or more enemy ships and escape with 5 ships.

Carthage must sink or capture 11 Roman ships to win.

Any other result is a draw

Models on display
The models on display are 1:600 scale. They were all produced by Xyston Miniatures. They were all painted in enamels by James Roach (Olicana Painting Service). The sea boards were kindly lent to the Ilkley Lads, for this action, by Brian Hicks of Leeds Wargames Club - thank you Brian.

I will add photos of the game ASAP after Fiasco. Unfortunately, I cannot set it up on my own table at present due to the ongoing 2nd Battle of Hispilis.

Bibliography
The Fall of Carthage by Adrian Goldsworthy (Cassel)
The Rise of the Roman Empire by Polybius (Penguin)
Various 'Wiki' and similar websites.

Thursday 18 October 2012

The 2nd Battle of Hispilis 204 BC

Hasdrubal opened hostilities with an attack on his right wing.....
...and an attack on his left. 
The cavalry attack on the right was inconclusive; that on the left was largely a matter of skirmishing by Numidians.


Scrotivius (aka 'The Old Scrote') writes of the battle's next phase: 

"Scipio gave the order. The Roman infantry, with blare of trumpet, went forward, en masse, without regard for themselves or the Gods: They went to do or die."

The Roman centre reaches its mark 
The Carthaginians launch several devastating countercharges along the line. 

Scrotivius again:

"But the enemy, undaunted, charged with war cries so fierce, and the ground beneath the feet of the elephants shook so violently, that the bravado of the legionaries wavered and several maniples broke at contact."

I rolled three maximum 12s in a row whilst Peter struggled to get a 2 in reply. 

On the right, supporting African infantry begin to tilt the balance. 
The battle becomes general all along the line. Casualties mount on both sides. 
Another shot of the Romans getting stuck in.


Six shots of the battle, from the Carthaginian left to right showing the state of play after the first nights play. The first shot shows the 'Carthaginian hope' - a vulnerable flank. In the centre the Spanish infantry and elephants, despite initial successes are looking decidedly flaky - they are simply no match for Scipios well trained 'veterans'.


Two further shots of the battle. In a moment of madness, I actually counted up the number of figures in this battle. I said that there were less than 1500 men: Quite a good guess, there were 1482 men.


Hopefully, we will will fight this battle to a conclusion next week. The battle has lasted only one turn so far (4 to go) but both sides have already lost 50+ morale chips each. The battle is, to say the least, bloody, very bloody.

Wednesday 17 October 2012

More SYW stuff painted


First up, another unit of Russian Hussars. This is my Venguerski Regiment, in a very fetching red. As with the last regiment of hussars I painted, this unit is along the lines of, 'on a budget', make do and mend. Firstly, they should be wearing tall fur hats, not these short ones. Secondly, I only have 7 of them, so to fill the space I used one of my precious Prussian horse casualties. I'm not sure where the hussar's horse came from, but the pose, after a bit of leg bending, was most useful and fitted the figure very well. Anyway two more shots of the unit, front and back.


Next up, my last battery of Russian guns (I still have a battery of secret howitzers and a battery of unicorns to do). This too is the product of a few eBay purchases, in that the stands came from at least three sources - guns, crew, infantry figs. And this begs a very big question: Why, given that artillery crew for guns was standardised, amongst the fraternity, years ago, at 4 figures per gun, did Wagames Foundry decide to do their crew packs in sixes? Anyway, I used a couple of spare infantry figures, the ones in white waistcoats, to make up the difference.


I now only have 6 Russian units in stock - another regiment of line infantry, and the five units (4x 36 fig line, and 1x 24 fig grenadier) of Observation Corps. Later, I'll finish off with the howitzer batteries (x2) and two more regiments of cavalry (1x dragoon, 1x horse dragoon) with purchases from Front Rank.

I have now done 31 of the 41 units. The end, as they say, is in sight.

Wednesday 10 October 2012

2nd Punic War Campaign: The End Game.


This was the campaign position after Hannibal's great victory. There now followed a long run of map play.

Rome - Card 3 - Used to assert political control of three areas.
Carthage - Card 2 - Used to assert political control of three areas.
Rome - Card 64 - Used to assert political control of two areas.

End of turn. New consuls were elected. Nero to Sicily. Paulus to Rome.

Rome: Card 39. Nero moved by sea to Praeneste via Rome and picking up troops en-route. Scipio moved to Segobriga.

Carthage: Card 19. Marcellus was dismissed by the Senate.

Rome: Card 12. Political control asserted over 2 areas.

Carthage: Card 58. Cato councils Rome not to send any troops to Africa.

Rome: Card 4. With the arrival of Scipio in the region, Celtiberia revolts!

Carthage: Card 46. Political control asserted over three areas in Celtiberia.

Rome: Card 56 . Political control asserted over two areas in Celtiberia.

Carthage: Card 22. Regional political control wrested from Rome in Sicily.

Rome: Card 43. Slave legions raised in Rome - 4 CU!!!

Carthage: Card 20. Hannibal to Bruttium.

Rome: Card 41. Scipio to Toletum.

Carthage: Card 47. Mago by sea via Croton to reinforce Hannibal with 5 CU from Africa.

Rome: Card 5. Scipio wrests regional control of Celtiberia.

Carthage Card17. Hannibal moves to Paeneste, trying to bring another Nero to battle but Nero is able to avoid battle by withdrawing to Rome.

Rome: 15. Scipio moves to Hispilis and brings Hasdrubal willingly to battle. Hasdrubal plays card 6 as a battle card to improve his army characterisation hand.

The 2nd Battle of the Hispilis

Scipio brought 12 CU to the battle whilst Hasdrubal brought 15 CU, which might not be the largest CU battle, but it must come close.  We have fought some quite sizable engagements in this campaign but we have always kept something under the counter, but as the campaign is nearing the end game, Peter and I decided to make it the largest figure battle yet. We got out all of the Romans and scaled from there. After working out the unit integrity count we dealt characterisation cards (Rome on the left):


Then we deployed. Here are some shots of the armies massed on the plain ready to do battle next week.


Now that looks like a cast of thousands - but I think it is actually less than 1500.