This scenario is for a battle based upon the events of 22nd November 1941 at Sidi Rezegh. The notes for this scenario were inspired by the scenario "Broken Spearhead" in Benghazi Handicap by Frank Chadwick. They have been fleshed out with information from Sidi Rezeg Battles 1941 by Agar-Hamilton and Turner, and the members of various web forums.
The game will be fought out at Fiasco later this year.
The game will be fought out at Fiasco later this year.
GENERAL BRIEFING FOR BOTH PLAYERS
Dawn has brought the fifth day of Operation Crusader: The major British offensive to relieve Tobruk and throw the Axis out of Cyrenaica . Yesterday saw the hardest and most chaotic fighting of the operation so far. Between Tobruk and Gabr Saleh, British and German formations became jumbled like the layers of a cake.
From west to east: British 70th Division was trying to sally out of Tobruk; 7th Armoured Brigade and Support Group, both of 7th Armoured Division, was trying to break through to them from Sidi Rezegh to link up with them at Ed Duda; sandwiched between these forces, and fighting both simultaneously, were Italian ‘Bologna’ and German 90th Light; 7th Armoured Brigade and 7th Support Group were facing both ways in an attempt to fend off a concerted attack by 15th and 21st Panzer Divisions travelling west out of the desert from the direction of Gabr Saleh; 15th and 21st Panzer divisions were, in turn, being harassed from flank and rear by 22nd and 4th Armoured Brigades (7th Armoured Division) which were chasing them westward. All were west of yet another battle, at the frontier, being fought by Axis forces defending the frontier and British XIII Corps.
The fighting was intense, especially around the aerodrome between the second and third escarpments at Sidi Rezegh. Here DAK had come out on top and the British, in terms of material, had taken a pasting. However, the British had shown a good deal of tenacity and had, despite heavy losses, maintained the very important strategic position at Sidi Rezegh.
Note: As can been seen from the map below, the position commonly referred to as Sidi Rezegh, between the second and third escarpment, is strategically vital to any operation in the Tobruk area (the Tobruk perimeter is approximately 3.5 miles north west of Ed Duda). Looking north from the third escarpment (at Point 178), it appears as a flat bottomed valley with ground that rises only slightly on the far side to the ridge of the second escarpment; it is ten miles long by four miles wide; it slopes imperceptibly down from east to west; it allows the passage of large armoured battle groups, moving in formation, to freely traverse from the top of the third to the bottom of the second escarpments. The area maked L.G. is the desert aerodrome.
 |
| The Battle Area. From a map in Sidi Rezeg Battles 1941 by Agar-Hamilton and Turner. |
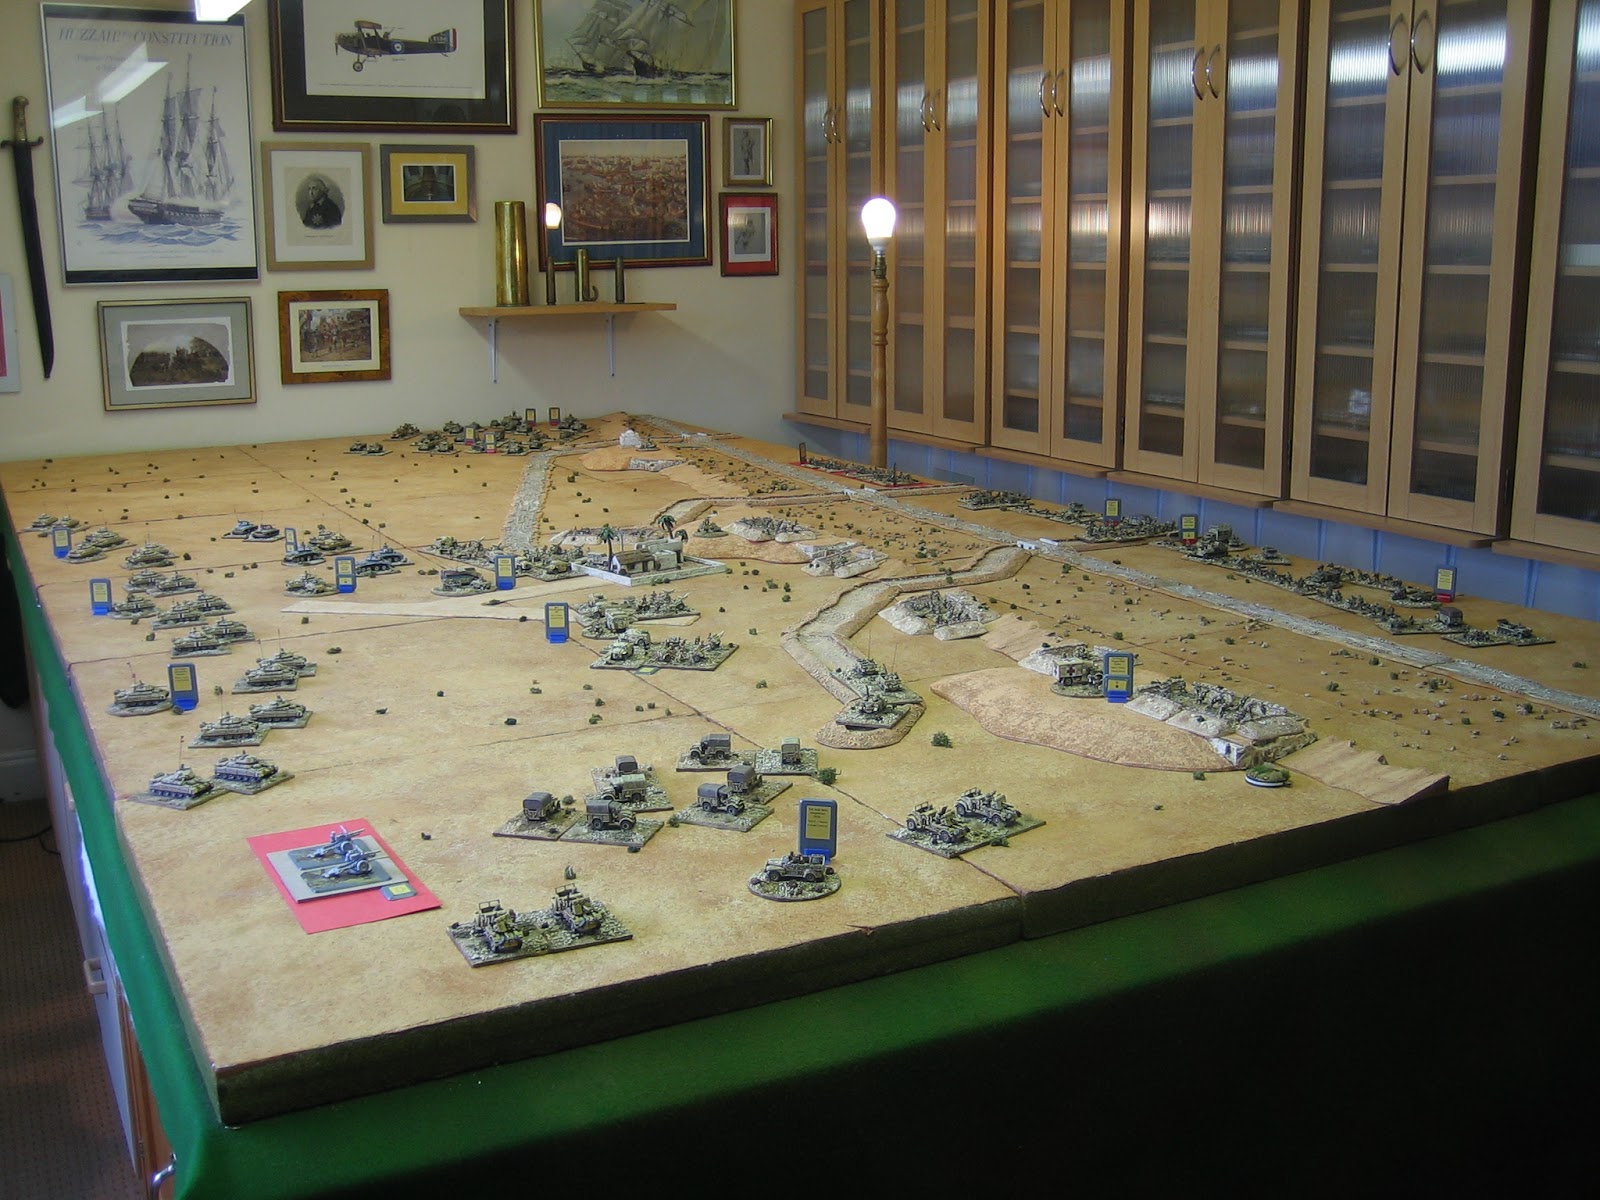
 |
| The Wargame Battle Area. It represents the second escarpment from, roughly Abiar el Amar to Point 163. This war game table is 12' x 6' and ground scale is 1": 50m approx. |
BRITISH BRIEFING FOR:
Brigadier Campbell (7th Support Group), officer commanding at Sidi Rezegh, 22nd November 1941.
Your Support Group and 7th Armoured Brigade have spent the morning reorganizing and consolidating their position at Sidi Rezegh. 1st Battalion, King’s Royal Rifle Corps (less one company) with a company of 2nd Battalion, The Rifle Brigade attached, have dug themselves in on a two mile long stretch of the second escarpment with commanding views over the Trig Capuzzo. The guns of Support Group, alongside 7th Armoured Brigade, have taken up positions, in a northward facing arc, around the aerodrome. To the south of the aerodrome 22nd Armoured Brigade stands ready to support you.
Both 7th Armoured Brigade and Support Group are not in the best of shape. Jerry has caused a good deal of damage and yesterday’s losses cannot be made good. Brigadier Davy’s tanks (7th Armoured Brigade) have faired the worse: This morning he has reported that he has 28 runners, all that remain out of the 168 tanks with which he started the operation five days ago, and several of these have been hit more than once during the previous fighting. 22nd Armoured Brigade has suffered too: It is at two thirds strength following its foolhardy action at Bir el gubi against the Italians on the 19th of November and running battles with Rommel’s panzers ever since. It is a comforting thought that the Germans withdrew their armour, northward, down the wadis of the second escarpment, out of the immediate battle area this morning. Only shelling by German heavy artillery shooting from Belhamed is currently, and sporadically, disturbing the peace.
Plans for further advances to link up with 70th Division at Ed Duda have been suspended until the infantry of 5th South African Brigade reinforce your position from the south. Major General Gott (7th Armoured Division) has personally given you orders to hold the Sidi Rezegh area at all cost. It will be the jump off point for units battering their way to relieve Tobruk. Following the arrival of the reinforcements, a northward advance on Ed Duda can be resumed. God willing, Jerry will leave you alone long enough to get things organised.
BRITISH OOB, GAME NOTES & VICTORY CONDITIONS

All field artillery (25pdrs) units are veterans with elite morale status. The tanks of 22nd Armoured Brigade are green troops with high morale. The tanks of 7th Armoured Brigade are trained with high morale. All infantry are veterans with high morale.
Note: The artillery present fought with a tenacity and discipline that was remarked upon by all . Consequently, I must give it elite morale status.
Note:The tanks of 22nd Armoured Brigade have been classed as green with high morale because of their enthusiastic, over confident ineptitude during the early phases of Operation Crusader. They were, to coin a phrase, fresh off the boat.
Brigadier Campbell is a heroic, average commander. All other commanders are average.
The infantry of 1st Battalion King’s Royal Rifle Corps, less carrier platoons, start the battle in sangars. One battery of 3rd Royal Horse Artillery (2pdrs), may be attached to 1st Battalion, KRRC and be in sangars. FOOs can deploy anywhere above the second escarpment. All other troops must deploy in their designated deployment areas.
Batteries of 3rd Royal Horse Artillery (2pdrs) that are not attached to 1st Battalion, KRRC start the battle on their portees with guns facing east.
The guns (25pdrs) of 60th Field Regiment, RA are a brigade level asset. One battery of is prioritised to the battalion command stand of 1st Battalion, King’s Royal Rifle Corps. They start the battle deployed for action.
C Battery, 4th Field Regiment, RHA (25pdrs) is attached to 22nd Armoured Brigade. This battery was assigned to the brigade from the outset of Operation Crusader (it is a brigade asset). The battery is prioritised to Brigadier Scott-Cockburn. It can start the battle on table and limbered, or it can be kept as off table support deployed for action.
22nd Armoured Brigade starts the game inactive; it cannot be moved; it cannot shoot; it cannot direct a barrage. This ruling represents the Brigade actually being somewhat south of its on table deployment area. 22nd Armoured Brigade is activated on any one of four events; activation represents the brigade's arrival in the battle area.
- The formation is activated on the appearance of a Desert Rats (Event) card.
- The formation is activated on the appearance of an Afrika Korps (Event) card.
- An enemy unit (other than aircraft) comes within 20”.
- The formation is fired upon by any ground troops.
VICTORY CONDITIONS
To achieve a decisive victory, at last light (end of turn 6) you must:
- Hold the two points of high ground currently held by 1st Battalion, KRRC.
- Hold the aerodrome buildings.
To achieve a crushing victory, at last light (end of turn 6), you must:
- Achieve the requirements of a decisive victory.
- Get four companies (any strength) of tanks or infantry across the northern (German) base line west of the aerodrome track – they move onto Ed Duda.
GERMAN BRIEFING FOR:
Major General von Ravenstein, officer commanding 21st Panzer Division, 22nd November 1941.
Yesterday was a successful day for 21st Panzer Division. At the end of the day there was no doubt that you had come out on top. However, the Tommies have shown a good deal of tenacity and, despite heavy losses, somehow maintain their position at Sidi Rezegh.
This morning, following receipt of orders from DAK, 15th and 21st Panzer Divisions moved north, down the wadis of the second escarpment, to take up defensive positions. 21st Panzer Division was ordered to concentrate at Belhamed and be ready to counter-attack any resumption of the British advance on Ed Duda from Sidi Rezegh. You have disposed your formation accordingly and it has refuelled and replenished without hindrance from an enemy who seem content to stick to their ridge.
Late this morning General Rommel arrived at Division Headquarters. He has personally given you new orders. You must advance and secure the second escarpment. This area is of vital importance to the enemy for their future operations to relieve Tobruk. He has ordered you to undertake a two pronged attack. Group Knabe will make a frontal attack from the north supported by the heavy artillery of Group Bőttcher (408th Heavy Artillery) on Belhamed. Meanwhile, Group Stephan will take a circuitous route via the by-pass road to Ed Duda then attack the aerodrome from the west. He assures you that the British at Sidi Rezegh are a beaten force with nothing more to offer than a stiff upper lip. One more sharp shock will send them scurrying for The Delta.
GERMAN OOB, GAME NOTES AND VICTORY CONDITIONS


All German troops are veterans with high morale.
Major General von Ravenstein, Lieutenant Colonel Stephan, and the commander of 2nd Battalion, 104th Schuetzen Regiment are a skilled commanders. All other commanders are average.
FOOs can deploy anywhere north of Trig Capuzzo or with Group Stephan. All other troops must deploy in their designated deployment areas.
Group Stephan starts the game inactive; it cannot be moved; it cannot shoot; it cannot direct a barrage. This ruling represents the Brigade actually being somewhat north and east of its on table deployment area. Group Stephan is activated on any one of four events; activation represents the groups's arrival in the battle area.
Major General von Ravenstein, Lieutenant Colonel Stephan, and the commander of 2nd Battalion, 104th Schuetzen Regiment are a skilled commanders. All other commanders are average.
FOOs can deploy anywhere north of Trig Capuzzo or with Group Stephan. All other troops must deploy in their designated deployment areas.
Two 10.5cm batteries of 2nd Battalion, 155th Artillery Regiment are a division level asset. They are prioritised to Lieutenant Colonel-Knabe. They are shooting from Belhamed; from an elevation 25m higher than the Trig Capuzzo but lower than the escarpment.
One 10.5cm battery of 2nd Battalion, 155th Artillery Regiment is attached to Group Stephan for direct fire support. It is a brigade asset prioritised to Lieutenant-Colonel Stephan.
One 10.5cm battery of 2nd Battalion, 155th Artillery Regiment is attached to Group Stephan for direct fire support. It is a brigade asset prioritised to Lieutenant-Colonel Stephan.
The three batteries of 408th Heavy Artillery Battalion, Group Böetcher are Corps artillery prioritised to the general support of 21st Panzer Division. They are shooting from Belhamed; from an elevation 25m higher than the Trig Capuzzo but lower than the escarpment.
- The formation is activated on the appearance of an Afrika Korps (Event) card.
- The formation is activated on the appearance of a Desert Rats (Event) card.
- An enemy unit (other than aircraft) comes within 20”.
- The formation is fired upon by any ground troops.
Optional: Two Panzer III companies (one in each battalion) can be three stands (vehicles) strong. For aesthetic purposes, the extra tanks should be represented by Panzer II tanks.
VICTORY CONDITIONS
VICTORY CONDITIONS
To achieve a decisive victory, at last light (end of turn 6) you must:
To achieve a crushing victory, at last light (end of turn 6), you must: - Secure the two points of high ground currently held by 1st Battalion, KRRC.
- Secure the aerodrome buildings.
- Achieve the requirements of a decisive victory.
- Cause the destruction or retreat of all British armoured units.
TERRAIN NOTES

For movement the escarpment is type IV terrain. It provides a superior position when shooting to lower elevations. Reentrants (breaks in the escarpment) are treated as wadi (except if in column on the aerodrome track, which is type I terrain). Reentrants reach the height of the escarpment in line with the back edge of the representation of the ridge.
The high ground is treated as escarpment on its northern face and type I high ground elsewhere. It provides a superior position when shooting to lower elevations.
Wadis are type II terrain. They provide type II cover to infantry in depth, line or column formation if all stands are at least 50% in contact with the wadi bottom (a little common sense may be required here). They only provide type II cover to vehicles and guns traversing them in column.
Broken ground is type II terrain. It provides type II cover to infantry ending a move with a successful Other Difficulty check.
Aerodrome buildings provide type II cover; they do not block line of sight.
All other areas are type I terrain.
Note: Infantry, as per usual, will treat all terrain as one type better for movement.
6 comments:
Well researched scenario and a table that should look great at a show. What rules are you using out of interest?
That's Fiasco a definite now then!
That is a beautiful table. Well done sir.
Very impressive! Wish I could see it in the flesh.
Cheers, Simon
Very impressive indeed! Great stuff.
Benno
(Benno's Figures Forum)
Very comprehensive scenario and you set an outstanding table.
Well done!
Post a Comment