Thursday 28 May 2015

Chotusitz, AAR, part 2

Yesterday Peter and Graham went at it again in the Chotusitz game. 


 It wasn't long before Frederick's Prussian infantry arrived.
The Austrians had brought their reserve line through their front line in expectation but the Prussians. But from their arrival they extended beyond their flank. 

This was the historic position. The Austrians were committed before Frederick made his move.
The cavalry battle had spent both forces so this wing was desperately exposed.

Out of over two dozen cavalry regiments deployed, only three were still effectively in the field.
 The Prussians came on in grand style and a fierce exchange of musketry resulted.
 But, that exposed flank.
 It wasn't a surprise when Frederick's troops turned onto it.
 The Austrians rushed Grenzers from the western flank to interdict the Prussian manoeuvre but the Prussians ignored the sniping and came on.

The Grenzers were rolling big dice but kept rolling low - the situation was similar for the Grenzers shooting from Chotusitz on the other wing.
 The position was looking desperate for the Austrians.
 The Austrians, outflanked, began to collapse.
 The Austrian line crumbled without pause until a failure of major morale resulted in an undisputed Prussian victory.
The Austrians had done quite well (historically speaking). They had routed Leopold and were within reach of occupying Chotustiz and reforming a defensive line with which to hold Frederick. However, the Prussian reserves arrived on time, in the right place, and with a following wind (the cards in the Prussian sequence deck fell very kindly). A battlefield victory to the Prussians.

Next up, a battle using Simon's To the Strongest rules. Rome and Carthage will take the field again.

Sunday 24 May 2015

Chotusitz - Peter J as Prussia, Graham H as Austria

This is a short report on Wednesday's night's play. 

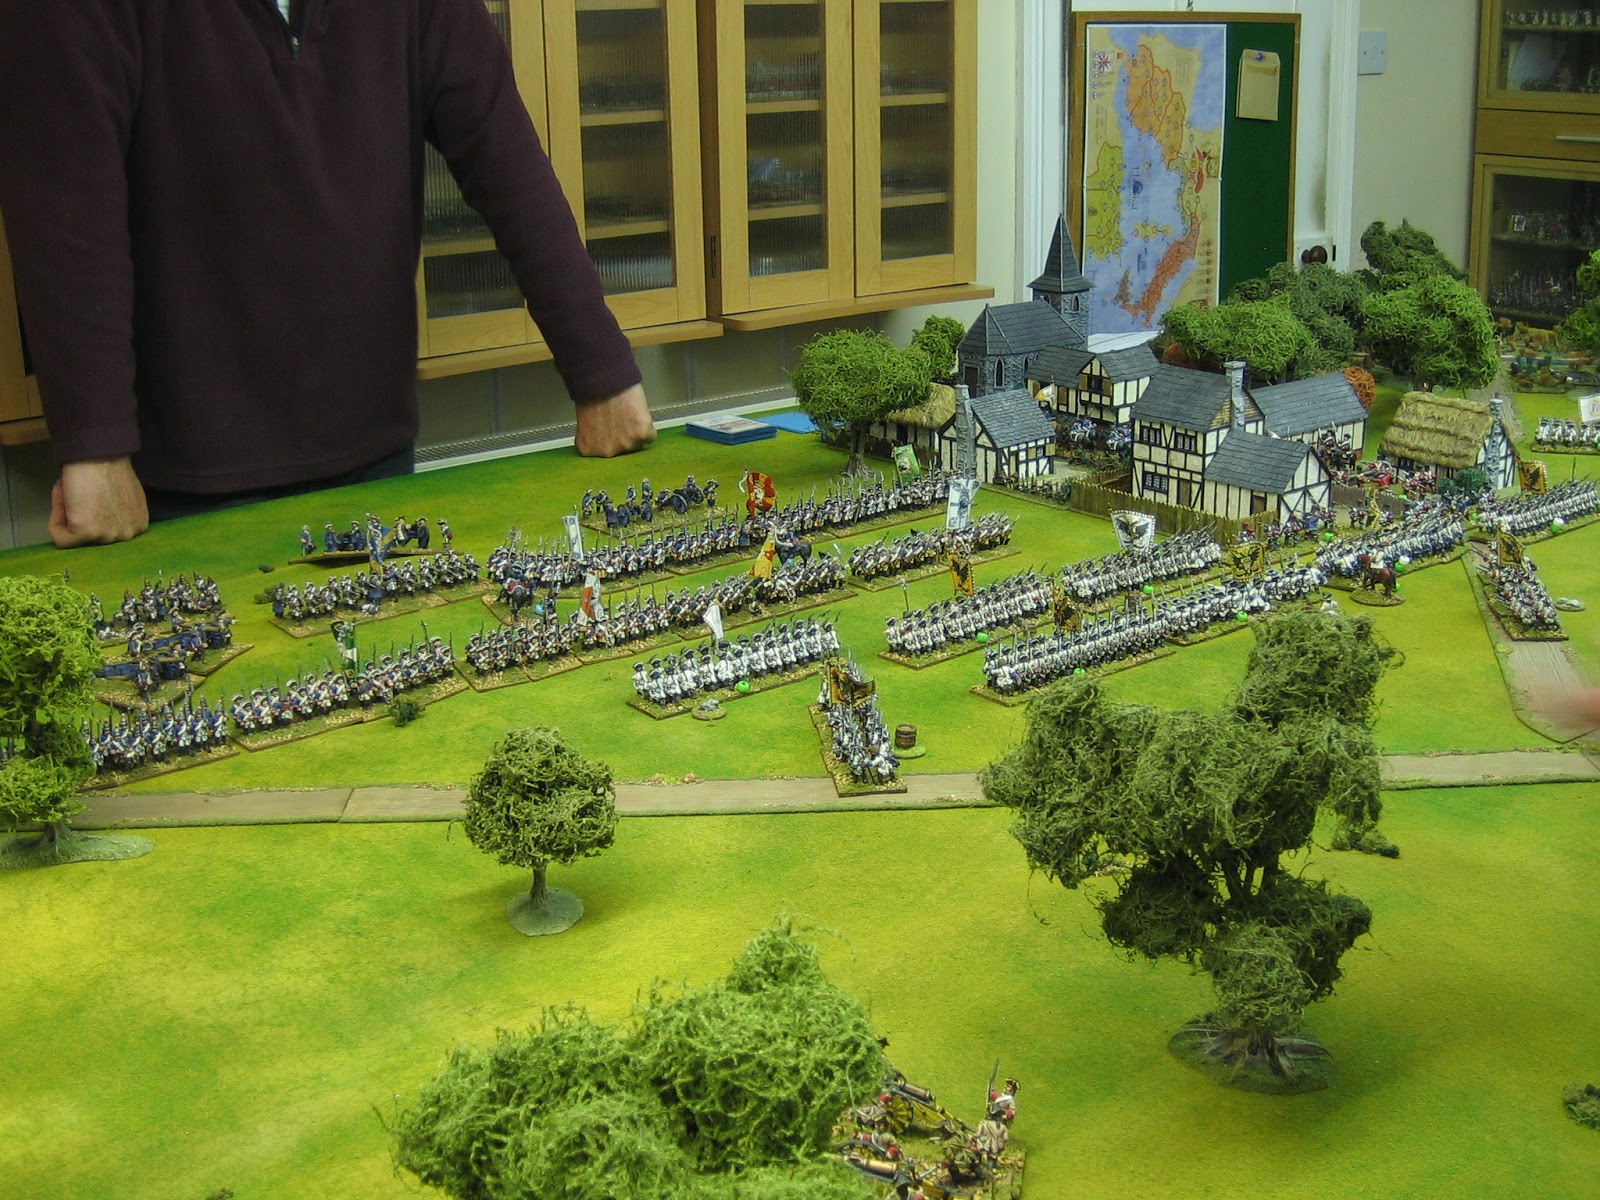
I have reset the table since the solo play test by advancing Chotusitz almost to mid table and sliding it towards Chirkwitz pond; Chirkwitz pond has been shortened to keep the gap between it and Chotusitz constant; The Brslenka stream has been removed from the flank edge of the table making even more room for the cavalry to operate here.

Graham wasn't going to hang around for the Prussians. 

Bitthyanyi, commanding the Austrian cavalry on the west wing ordered his men forward. 

Down the hill they went, all full of hubris.

Peter couldn't believe his luck. Buddenbrock's cuirassier came to meet them. 

It's normally Peter who is King of the Ones but on this occasion he defied the dice. 

Back up the hill the Austrians came, all full of holes. 

The only way Graham was going to get these Prussians from the field was to let them chase him. 

It was a disaster.
In the centre the infantry line belatedly began to push forward. 

As they advanced Leopold's Prussian's slowly back stepped to buy time. Leopold's troops had force marched to Chotusitz and had been downgraded accordingly - outnumbered and tired, not a great combination.

A unit of Austrain hussars fancied their chances against Leopold's isolated guns (top left). 

"Boom!" went the guns. "Ouch!" went the hussars. Graham began inspecting the dice he was using.

At the eastern end of the field the cavalry were trading blows punch for punch, though at the beginning of the encounter it looked as though the crown for throwing ones had truly passed to Graham.
The infantry battle in the centre began with both side's trading vollies as fast as they could reload. The Austrians began taking casualties but the weight of firepower was with them and the Prussians began to falter.

The Austrians broke into Chotusitz. 

The Grenzers began shooting at demoralised Prussian cavalry that was milling in the streets and preventing further advances.

In the actual battle Chotusitz caught fire. Every time a unit fires a volley from inside Chotusitz I roll a d20. On a result of 1 a fire will start. It will spread, on major morale cards, on a 1 on d6.

Then Leopold's line broke!

Graham had stopped rolling ones.
"Oi, now where do you think you boys are off to?"

That was a good point to end the session. We are part way through turn two and Frederick and his reinforcements are about to arrive. This is going to get very bloody.

Friday 22 May 2015

Napoleonic Project: In for a penny........

Well, I've finally gone and done it. My Peninsular War project has officially begun. I have just placed a bulk order with Front Rank to tie me in.

Being something of a novice when it comes to Napoleonics I found the whole process of deciding what to buy quite arduous. In the end, I decided to start the collection by doing some units for a couple of divisions at Salamanca. I'm sure the units will get used to represent others, in other divisions, as needs must, but you have to start somewhere.

I have organised my divisions using the army builder method in Lasalle rules by Sam Mustapha. He uses four stand battalions each representing 500 - 700 infantry, or 300 - 500 cavalry. Where brigades have much weaker battalions they are amalgamated (representing two units with one) to bring them up to this strength. I liked this idea; I probably liked it because it keeps things very simple. Exceptionally strong battalions (like British Guards) have six stands. All of my infantry will be based with six figures per stand / in units of 24 (or 36 if large). All of my cavalry will have three figures per stand / in units of 12. Each infantry battalion will have an additional skirmish element (Light Companies / Voltigeurs) represented by two stands each of two figures, plus additional stands of skirmishers held at brigade level (rifle companies). I will be basing and collecting these armies as a 'stand alone collection' so I'll decide on stand dimensions later and not worry too much about basing for any particular rule set - in short, I'll base to please myself.

Now, even though this order was going to be quite a big one (it actually crashed Front Ranks system and had to be part submitted over the phone) I did have a strict budget (which I overspent by £1.88). Consequently the sides are not quite as balanced as I would like. Balancing it would have cost a good few hundred pounds more and I couldn't afford it. So what did I buy? Well, this is what the initial forces should look like.


BRITISH


First Division (H. Campbell)

Fermors Brigade: Coldstream Guards (large unit); 3rd Guards (large unit); a rifle skirmish stand.

Wheatley's Brigade: 2/24th; 1/42nd (large unit); 1/79th; 2/58th (not represented, mixed with 2/24th); a rifle skirmish stand.

Lowe's Brigade: 1st KGL; 2nd KGL; 5th KGL.


3rd Division (Packenham)

Wallace's Brigade: 1/45th; 74th; 88th; three rifle skirmish stands.

Campbell's Brigade: 1/5th; 2/5th; 2/83rd; 94th (not represented, mixed with 2/83rd).


Independant Portugese Brigade (identity not decided)

I have given this brigade a strength of three battalions of line and a battalion of cacadores representing about 2,500 men.


Artillery

I have purchased three two gun batteries at present. These will be upgraded to three gun batteries later. There is one British foot battery, one Portugese foot battery, and a British horse battery. There are also limbers, of course, which will have to do to make up third guns initially.


Cavalry

Van Alten's Brigade: 14th Light Dragoons; 1st Hussars KGL.

Bock's Brigade: 1st Dragoons KGL; 2nd Dragoons KGL.

I know there are too many cavalry, but I'll usually only field a single brigade and it's nice to have a mix of types to play with.


FRENCH


1st Division (Foy)

Brigade Chemineau: 6th Leger (2 battalions); 69th Ligne (2 battalions)

Brigade Desgraviers-Berthelot: 39th Ligne (2 Battalions); 76th Ligne (2 battalions)


2nd Division (Clausel)

Brigade Berlier: 25th Leger (3 battalions); 27th Ligne (2 battalions).

Brigade Barbot: 50th Ligne (2 battalions); 59th Ligne (2 battalions).


Artillery

Two foot batteries and one horse battery. (see notes on British guns)


Cavalry

Brigade ?: 3rd Hussars; 26th Chasseurs; 22nd and 28th Chasseurs not represented, they are mixed with the other cavalry.

Brigade Carrie: 13th Dragoons; 14th Dragoons.

See note on British cavalry.


WHAT ELSE

So what else did I buy. Well of course you can't start one project without finishing the last, so I decided to purchase the last of my Seven years War stuff, bringing the whole collection (Prussian, Russian and Austrian) up to 163 units (or just shy of 2,500 figures). 

3 Regiments of Austrian Hussars; 2 Regiments of Austrian Cuirassier; 1 Regiment of Austrian Dragoons; 1 Regiment of Austrian Horse Grenadiers (elite coys); 1 Regiment of Austrian Grenadiers (combined grenadiers); 2 Regiments of Austrian infantry; 2 units of Austrian Grenzers; 2 batteries of Austrian guns; 2 Regiments of Prussian Cuirassier.

I'd like to say job done, but apart from having to paint them all, starting the Peninsular War Project is still some way off. I'm also dead broke again. 


Sunday 10 May 2015

More SYW cavalry with dodgy flags

According to my Oxford dictionary, the definition of DODGY is "1 dishonest. 2 risky. 3 not good or reliable." Of these, I would choose 'risky' and 'unreliable' for these flags.

The flag for the Kolowrat-Krakowski Dragoons is very 'risky' and wholly unreliable.   Kronoskaf has no description of Ordinair-standarten other than they had a red field. Following the general Ordinair-standarten 'formula', I have chosen to put an imperial eagle on the obverse and the Kolowrat coat of arms on the reverse. I got the coat of arms from the internet so I can't be sure if it is right for this period. I particularly like this coat of arms because it follows the uniform of the dragoons very closely and consequently it ties in very well. I have also taken a risk with the fringe, tassles and spear point. I have chosen to do these as 'silver' rather than the usual 'gold' for no other reason than this regiment is one of the few regiments that used steel hilted swords.

The flag for the Wurtemberg Dragoons is loosely based on the description given by the entry on Kronoskaf. The description, like most of the complex flag descriptions on Kronoskaf, is a little hard to visualise and this one makes no sense at all  (to me); still, this version is pretty enough.

Some pictures of the figures. All are Front Rank Miniatures painted by yours truly in enamels. They will join another four recently painted units on the 'to-base' list.


The Kolowrat-Krakowski Dragoons. I have chosen to field this regiment represented by horse grenadiers from its elite company; this will allow me to field this unit as either ordinary dragoons or as a unit of converged elite companies. The Austrians often split off their elite companies so this will probably prove to be a very useful unit, and I aim to do another one.

The 'Kolowrat' coat of arms is rather pretty, isn't it?

The Wurtemberg Dragoons in fetching red and black coats and straw waistcoat. I particularly like the casualty on the falling horse.

This is my simplified version of the flag described on Kronoskaf. Red, yellow and 'silver' work very well. I never use metallic paint on 'flowing cloth' of any description because to me it always looks wrong. 
So there we have it: Two more units for the Austrians. Next up, with the Chotusitz scenario in mind, I will do a unit of Austrian cuirassiers and a few units of (the last four units I plan to do of) Prussian infantry, including IR 15 The Garde. I've chosen to do the latter as III battalion in mitres, so it will stand out on the table - grenadiers with a flag!

EDIT: From the last photo I noticed all of the right cuff buttons I missed - now done yellow metal like the others. It's a funny thing that when you start missing a detail you miss it quite often - a blind spot so to speak. I must have worked sword hilt, then front of figure, and having seen the sword hilt done (because it sticks up) stopped turning the figure and missed the cuff buttons.

Saturday 9 May 2015

CHOTUSITZ - A short report on the first two moves of the solo game

 The Austrians pushed forward with their infantry. The gun line caused some confusion as the infantry moved to keep the fire lanes open.

After the I'd played this through I suddenly realised the Austrians were over egged in the artillery department so the problem will be less of an issue in subsequent re-fights.
 The Grenz on the Austrian left pushed forward to taunt the Prussian cavalry with a desultory fire.
 On the Prussian left Waldow's cavalry began to deploy....
 ....and with the aid of a Brilliant leader card, accomplished the feat with alacrity.
 On the Prussian right, as Buddenbrock came forward, the Austrian cavaly under Bitthyanyi descended the ridge to meet them and support the Grenz which were looking decidedly overexposed.
 On the Austrian right Liechtenstein's cavalry took the initiative. 
 It wasn't long before the cavalry action on both wings became a swirling melee of charge and counter charge. 

Things didn't progress very historically - the Prussians came off worst on both wings - but there is no accounting for some dice rolls!
 Turn two saw the Austrian infantry beginning to engage. It was at this moment that I began to see a problem with the set up. 

I realised that I had set up the battle with Chotusitz and Leopold's command too close to the Prussian base line. Although I had left the timing of Frederick's arrival vague, it soon became apparent that he would have no room to manoeuvre when he did arrive.
 Leopold's infantry began to scramble into Chotusitz.....
  ......before overwhelming numbers of Austrian white coats, admittedly with some casualties, smashed all before them.
 As turn 2 came to a close the cavalry battle on the right was finally resolved and the Austrians, much dispersed, had total control of this wing.
 The infantry assault on Chotusitz was about to begin.

You can clearly see, in this picture, the restricted space into which Frederick can deploy (between the road exit on the Prussian baseline and Chotusitz). When he arrives it will be immediately into the teeth of Austrian musketry.
 On the extreme right the Austrians prepared their cavalry to redeploy towards the left.

This picture shows another error in the set up. I chose to feature the Brslenka stream and boggy ground along the whole length of this end of the table. It took up too much room and made the deployment area between it and Chotusitz too narrow.
I could see that the game, due to the set up, would not work as planned so I called a halt to it. I will reset the table before attempting the battle again. Solo games have more uses than just to have fun.

I've decided to play it at almost one unit to one regiment next time. I've just got one more unit of Austrian cavalry to paint ( I painted two more last week), two or three units of Prussian infantry in tricornes (so I don't have to use fusiliers) and a unit of the Guard (3rd battalion in mitres).

Sunday 3 May 2015

A bit more painting in the last days of April

At the start of the month I thought I was doing quite well with my painting effort: By mid month I had painted forty eight Austrian infantry and quite a nice looking unit of Esterhazy Hussars. Then everything stopped. The plans I had for painting my own stuff, numbers wise, looked like they were taking another nose dive.


Fortunately, I've managed to drag things back in the last days of the month. I've added another unit of Austrian infantry, and with plans for the Chotusitz scenario in mind, three units of Austrian Grenzers. Back on track; 96 infantry, 8 cavalry and four flags done this month.

I have finally decided how to paint my Grenzers. I like these uniforms so much I'm going to go for maximum uniform variation over 'order of battle' accuracy. I will paint only one 'battalion sized' unit from each regiment and field very mixed looking forces of them. 

 First up, a unit painted as Infantry Regiment 42 Gaisruck. 

I find anything purple / violet hard to paint as the enamel choice is extremely limited. Consequently, this unit has 'sun-faded' facings.

This is the fifth unit I've painted in this 'marching' pose. If you have to paint lots of Austrians (by Front Rank) it is definitely the pose to paint - the arm position covers up almost all of the frontal straps and lapel detail.
 I've given this unit a white Colonel's Liebfahne based on the Greenwood and Ball illustration. This standard is different on each side. 

I prefer the yellow regimentsfahne, because it has more contrast with what are basically white uniformed troops, but as Austrian infantry standards have no 'unit distinction'  it is the only variation possible. So far I've painted at a ratio of 5 liebfahne to 8 regimentsfahne.
Three units of Grenzers.

Front Rank only make Grenzer in one uniform so some minor alterations will be required for the types I want; I've already painted three units from the Karlstadter military district wearing the Front Rank uniform. The Banal military district has a similar uniform, but the colours are very similar to the Karlstadter, so I've chosen not to do the 'Banal Grenzers'.


The first two units represent units from the Warisdiner military district. 

Warisdiner-Creutzer with dark green dolman and cuffs, and Warisdiner-Sankt Georger in light green dolman and cuffs.

The cuffs are plain square cut for these regiments so their was some work required removing the pointed, braid edged cuffs before painting.
The first of three units from the Slavonisch military district.

A unit of Slavonisch-Gradiskiner in a very fetching uniform of red and two shades of blue edged with yellow braid. 

The other two regiments from this region will require quite a lot of minor uniform alteration before painting.